

How To Add A Vertical Line In Word
Please Notation: This article is written for users of the following Microsoft Word versions: 2007, 2010, 2013, 2016, 2019, and Discussion in Office 365. If you are using an earlier version (Give-and-take 2003 or earlier), this tip may not piece of work for you. For a version of this tip written specifically for before versions of Word, click hither: Vertical Lines in Word.
 Please Notation: This article is written for users of the following Microsoft Word versions: 2007, 2010, 2013, 2016, 2019, and Discussion in Office 365. If you are using an earlier version (Give-and-take 2003 or earlier), this tip may not piece of work for you. For a version of this tip written specifically for before versions of Word, click hither: Vertical Lines in Word.
Vertical Lines in Word
![]()
For some documents you may accept a demand to insert vertical lines. There are actually four or v ways you tin exercise this in Give-and-take. The bodily method you choose depends on your document needs and which appeals to you lot the nearly.
Drawing a Line
The outset method involves drawing a line:
- Display the Insert tab of the ribbon.
- Click the Shapes tool and and then click one of the line shapes from the Line group. The mouse pointer changes to a crosshair that looks like a big plus sign.
- Click at one finish of where you want your line, but don't release the mouse button.
- Drag the mouse to where you want the other end of the line positioned.
- Release the mouse button.
Using Bar Tab Stops
The 2nd method involves using bar tab stops. You can see how these appear by following these steps:
- Select the paragraph or paragraphs that yous want to contain vertical bars.
- Display the Home tab of the ribbon.
- Click the minor icon at the lower-right of the Paragraph group. Word displays the Paragraph dialog box.
- Click the Tabs button, at the lower-left of the dialog box. Word displays the Tabs dialog box. (See Effigy 1.)
- In the Tab Stop Position box enter a horizontal measurement that indicates where you lot want the bar to appear. Thus, if you desire it 2 inches from the left margin, you would enter 2 in the box.
- Click on the Bar radio push button.
- Click on Set up. (The Ready push will not be clickable until you at least enter a measurement, as noted in step five.)
- Repeat steps 5 through seven to set other bar positions.
- Click on OK when you are done.
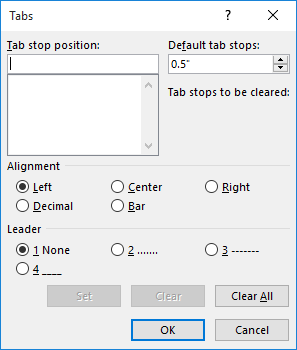
Figure 1. The Tabs dialog box.
The bar tab stops are simple, i-point black vertical lines. (There is no way to change line weight or color.)
Using Borders
Some other method that works well if you desire the line to appear abreast a paragraph is to use borders:
- Place the insertion signal within a paragraph of text or, if preferred, select the entire paragraph.
- Display the Home tab of the ribbon.
- Click the downwards-arrow adjacent to the Borders tool, in the Paragraph group. Word displays a drop-downward listing of options.
- Cull the Left Edge or Right Edge option, as desired. Word adds the edge to either the left or right side of the paragraph, every bit advisable.
Lines between Columns
If you have multiple columns in your document and you want vertical lines between the columns, you lot can follow these steps:
- Select the text that y'all desire in columns. (If you lot don't do this step, and then your entire section or document will be formatted into columns.)
- Display the Layout tab of the ribbon.
- Click the Columns tool in the Page Setup group and then click More than Columns. Discussion displays the Columns dialog box. (Come across Effigy 2.)
- Specify the number of columns into which you want the text formatted.
- Make sure the Line Between cheque box is selected.
- Click on OK.
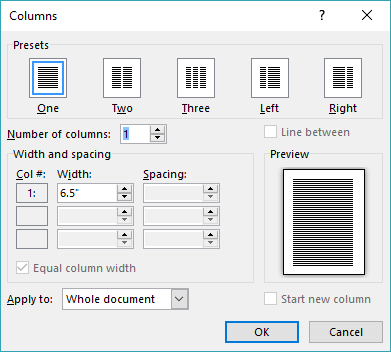
Figure 2. The Columns dialog box.
Using Tables
The concluding way to create vertical lines is to use tables. While this may seem a scrap convoluted, it volition work swell for small sections of text. To use this method, follow these general steps:
- Create a table that has a unmarried row but equally many columns as you want your text divided into.
- Select the table.
- Make sure the Tabular array Design tab of the ribbon is displayed.
- Click the Borders tool (in the Table Styles group) and then cull No Border.
- Again, click the Borders tool and then choose Inside Vertical Edge.
- Enter your text in each cell of the table.
WordTips is your source for cost-constructive Microsoft Discussion training. (Microsoft Word is the most popular word processing software in the world.) This tip (9503) applies to Microsoft Discussion 2007, 2010, 2013, 2016, 2019, and Word in Role 365. Yous tin find a version of this tip for the older carte interface of Give-and-take here: Vertical Lines in Discussion.
More WordTips (ribbon)
Do y'all like your text boxes to overlap each other or not. (Word allows both approaches.) This tip provides a couple of ...
Detect More
Ane of the lesser-known cartoon tools provided in Discussion is the drawing grid. You tin can easily turn this feature on and use ...
Discover More
If you receive a Word document from someone, you may desire to get any graphics it contains into their own files. You can ...
Detect More

How To Add A Vertical Line In Word,
Source: https://wordribbon.tips.net/T009503_Vertical_Lines_in_Word.html
Posted by: lopezortabow.blogspot.com
0 Response to "How To Add A Vertical Line In Word"
Post a Comment